FAQs
Those might have popped-up in your mind.
Categories
Are there any discounts available ?
Educational / Non-Profit Customers
We offer a 30% discount on all standard SecureNT Intranet SSL Certificates to educational institutions and non-profit organizations.
If you are eligible let us know your requirement and select 'Unable to make payment'. We will send you online payment link for the same.
Tagged In
No Comments Yet.
Can I have Wildcard SSL for IP Address ?
For protecting multiple IP addresses, Wildcard SSL is not possible. One has to buy either Single Domain or Multi-Domain.
Say, you wish to secure an entire range of IP addresses from 192.168.52.1 to 192.168.51.255.
For this, is it possible to buy Wildcard SSL for 192.168.52.*?
Unfortunately, no. That’s not possible.
For securing this IP address range, either one can buy Single Domain for each IP Address or Multi-Domain Intranet SSL certificate with required IP address in SAN values.
Tagged In
No Comments Yet.
Can we install SecureNT Intranet SSL Certificates on multiple servers ?
Yes. We give unlimited server license. You can install them on as many servers as you want.
No Comments Yet.
Do you issue Intranet SSL for internal names with regular TLDs ?
We issue Intranet SSL to all internal names, whether they use any regular TLD or not.
Some Private Certifying Authorities do not issue Intranet SSL if your internal domain name uses a regularly used Top Level Domain (TLD) name, including ccTLD reserved for countries.
For example, if your internal domain name is name1.com or name2.net, or name3.us then they won’t issue Intranet SSL Certificate to you. They will insist that you buy their regular SSL Certificate issued by a public CA.
Tagged In
No Comments Yet.
How do we make payment ?
You can buy the SecureNT Intranet SSL Certificate from this link.
We accept payment in multiple ways:
-
PayPal You can pay us online through credit / debit card etc using PayPal’s payment service.
-
Wire Transfer (Swift) to our bank account in India You can pay us through Bank Transfer (Wire-Transfer / Swift). We will send our bank details when you place your.
We accept payment in USD. If you wish to pay in local currency, we can help you to by putting you in touch with a reseller. Let us know.
We ship the certificate usually on the next business day.
Tagged In
No Comments Yet.
Is SecureNT Intranet SSL Domain Validated (DV) or Organization Validated (OV) ?
Since the SecureNT Intranet SSL Certificate is issued to an IP Address or Internal Name (localhost, URL, or Server name) located on the internal network of an organization there is no need to validate the Common Name (CN) or Organization name (O) or Subject Alternative Name (SAN) values.
We verify the correctness of the organization’s name from the organization’s public website.
Domain Validation (DV), Organization Validation (OV), and Extended Validation (EV) are required to be done as per the directive of the CA/Browser Forum for SSL certificates issued by the public Certifying Authority (CA).
SecureNT is a private CA.
No Comments Yet.
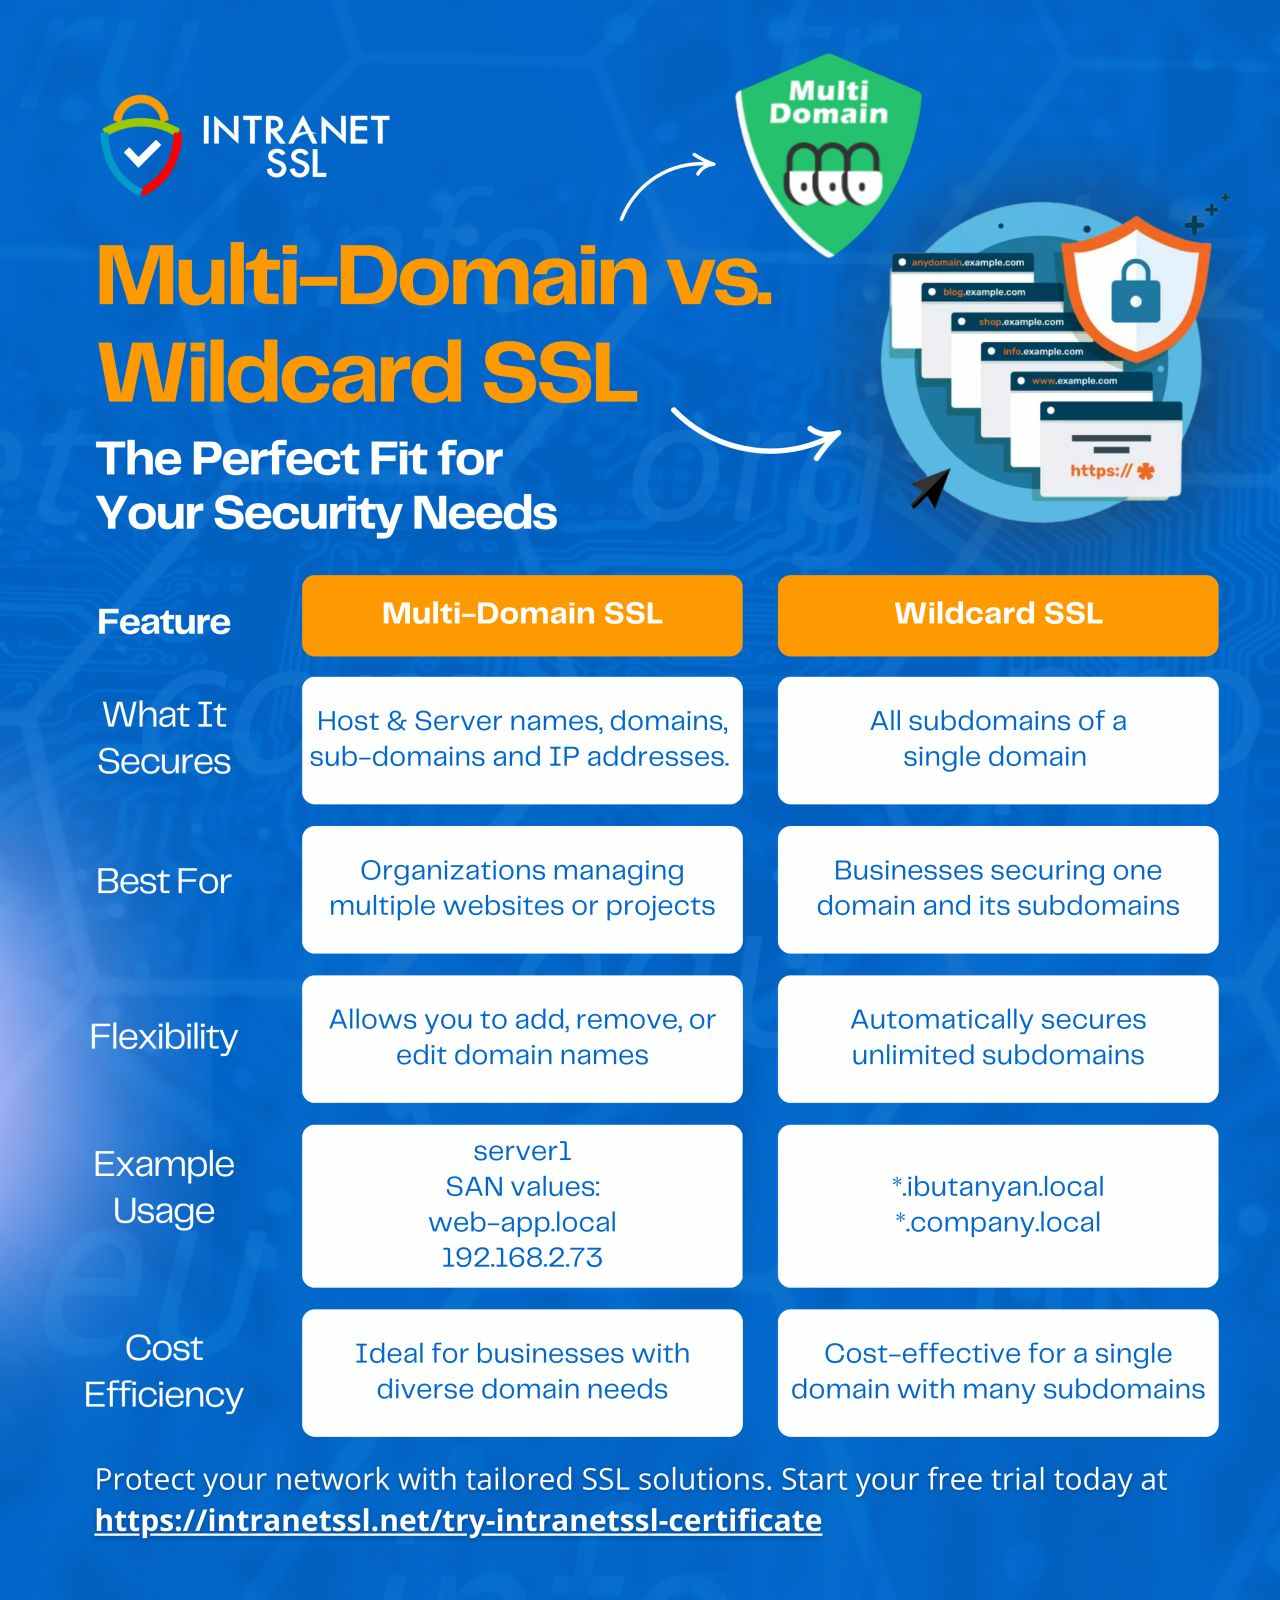
Multi-Domain vs. Wildcard SSL - What's the difference ?
A Wildcard certificate secures one domain and an unlimited number of accompanying sub-domains. A multi-domain Wildcard SSL certificate secures many different domains, sub-domains and multiple internal IPs with a single certificate.
Here is a feature by feature comparison:
Tagged In
No Comments Yet.
What Are Internal Names ?
Internal names include hosts and domains that cannot be registered or resolved in public DNS e.g., server01 or server.local, localhost, etc.
Internal IP addresses cannot be registered for use on public networks. They include IPv4 or IPv6 addresses the Internet Assigned Numbers Authority (IANA) marks as reserved. The most common reserved ranges are 10.0.0.0-10.255.255.255, 172.16.0.0-172.31.255.255, and 192.168.0.0 - 192.168.255.255. More information is available here.
Tagged In
No Comments Yet.
What are the various types of Intranet SSL Certificates offered by SecureNT ?
We have 4 types of Certificates.
-
Single Domain: SecureNT Intranet SSL Certificate – Single Domain secures an Intranet Server’s Local Host Name, Server Name, internal/public IP Address, or Web page URL using Secure HTTPS protocol.
-
Multi-Domain or SAN Certificate: SecureNT Intranet SSL Certificate – Multi-Domain (1 + 4 SAN) secures an Intranet Server’s Local Host Name, Server Name, internal/public IP Address, or Web page URL plus 4 SAN values using Secure HTTPS protocol. In case you wish to secure more than 1+4 SAN, then you will have to purchase additional SANs in multiples of 5 SAN values. There is no limit to SAN values.
-
Wildcard Certificate: SecureNT Intranet SSL Certificate – Wildcard secures an Intranet Server’s Server Name or Web page URL and all sub-domains using Secure HTTPS protocol.
-
Multi-Domain Wildcard Certificate: A multi-domain wildcard certificate is an SSL/TLS certificate that combines the features of both multi-domain (SAN) certificates and wildcard certificates. Thus, it can secure different domain names, multiple wildcard subdomains, and many IP addresses with a single certificate. Instead of purchasing separate certificates for each domain and subdomain, you can manage everything with one certificate, reducing complexity and cost.
Tagged In
No Comments Yet.
What is Top Level Domain (TLD) ?
TLD is the acronym used for top-level domain. It’s the last segment of a domain name after the final dot.
A great example of a TDL is: .com
The IANA officially recognizes three types of TLDs:
- gTLD – Generic Top-Level Domains
- ccTLD – Country Code Top-Level Domains
- sTLD – Sponsored Top-Level Domains Your TLD plays an important role in the Domain Name System (DNS). For more information click here.
Tagged In
No Comments Yet.
What is a Multi-Domain Wildcard SSL certificate ?
Instead of purchasing separate certificates for each domain and subdomain, you can manage everything with one certificate, reducing complexity and cost.
Multi-Domain Wildcard SSL Certificates can function as both a Wildcard and a Multi-Domain certificate. You can place wildcard value (an asterisk or star) in the SAN field.
Simplified Management: Easier to manage and renew compared to handling multiple individual certificates.
We offer a 7-day Free trial of Multi-Domain Wildcard Certificate.
No Comments Yet.
What is a Multi-Domain or SAN Certificate ?
A Multi-Domain (or Subject Alternative Name-SAN) certificate can support multiple domains, server names, and IP Addresses with a single domain. They reduce SSL cost and maintenance by using a single certificate for multiple websites using SAN. These certificates are more flexible than Wildcard certificates since they are not limited to a single domain.
Note: Only non-Wildcard names can be added as SAN.
Certificates are valid for a period ranging from 1 to 10 years. One can install the certificate on unlimited servers. We offer a 7-day Free Multi-Domain Certificate.
Tagged In
No Comments Yet.
What is a Single Domain SSL Certificate ?
SecureNT Intranet SSL Certificate – Single Domain secures an Intranet Server’s Local Host Name, Server Name, internal/public IP Address, or Web page URL using Secure HTTPS protocol.
Certificates are valid for a period ranging from 1 to 10 years. One can install the certificate on unlimited servers.
We offer a 30-day Free Single Domain Certificate.
Tagged In
No Comments Yet.
What is a Wildcard Certificate ?
A Wildcard certificate is a single certificate with a wildcard character (* – star) in the domain name field. This allows the certificate to secure multiple subdomain names of the same base domain.
For example, a wildcard certificate for *.(domainname).com, could be used for www.(domainname).com, mail.(domainname).com, blog.(domainname).com, etc. Also, a special case of (domainname).com is also secured.
Certificates are valid for a period ranging from 1 to 10 years. One can install the certificate on unlimited servers. We offer a 7-day Free Wildcard Certificate.
Tagged In
No Comments Yet.
What is an Intranet SSL Certificate ?
An Intranet SSL certificate is a Private/non-Public SSL (TLS) Certificate issued by SecureNT.
Technically, it is similar to the SSL certificates issued by Public CAs (like DigiCert, GlobalSign, Entrust, Sectigo, or Let’s Encrypt) but it is used on internal networks or private sites.
Thus, the Intranet SSL certificate is installed on the servers of an internal private network. After installation, whenever a user (client PC) on a local network connects to this server using a browser, all data flowing between the client PC and the server is encrypted and no one can read it, even with snooping tools.
Thus, confidential data and passwords flowing on the internal network remain secure from unauthorized users and even hackers.
Tagged In
No Comments Yet.
What is the pricing of SecureNT Intranet SSL Certificates ?
You may be surprised to know how competitively priced we are, compared to the competition.
The price of a SecureNT Intranet SSL / TLS Certificate for 1 Year is:
- Single Domain USD 110, INR 8,000
- Multi-Domain (1+4 SAN) USD 246, INR 17,600
- Wildcard USD 270, INR 20,000
- Multi-Domain Wildcard (1+4 SAN) USD 444, INR 32,000
You can find the prices here
If you wish to purchase them in your local currency, do let us know and we will share details of the reseller who can service your order.
We strongly believe in customer satisfaction. Our sales, SSL certificate issuance, and support policies are designed to meet customer needs.
No Comments Yet.
Why choose Multi-Domain Wildcard SSL Certificates ?
Multi-Domain Wildcard SSL Certificates gives you the flexibility to secure many different domains, sub-domains and IPs, while also reducing the burdens of managing individual certificates for each.
Tagged In
No Comments Yet.
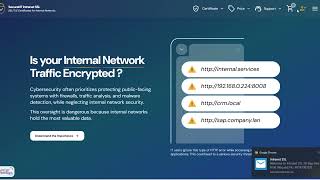
Why use an Intranet SSL on Internal Network Servers ?
CA/Browser Forum (CA/B), the regulatory body that governs the SSL industry, does not allow Public CAs to issue Public SSL Certificates to Private Internal Networks covered under IETF RFC 1918.
So, internal/private Servers have to use SSL Certificates from non-public CAs or Self-Signed Certificates.
Of course, some of these Public CAs do issue Intranet/non-Public SSL Certificates using non-Public Root Certificates. SecureNT Intranet SSL does the same but offers it quickly and at a much more attractive price.
No Comments Yet.
How to Install Root & Intermediate CA Certificates on Android ?
Please follow the below steps.
Android 11+ Device
In Android 11+, to install a CA certificate, users need to manually:
- Open Device settings
- Go to ‘Security’
- Go to ‘Encryption & Credentials’
- Go to ‘Install from storage’ or ‘Install a certificate’ (depending on devices)
- Select ‘CA Certificate’ from the list of types available
- Accept a warning alert.
- Browse to the certificate file on the device and open it
- Confirm the certificate installation
Samsung Device:
Settings:
- Biometrics and security
- Other security settings
- Install from device storage
- CA Certificate
- Install Anyway
Tagged In
No Comments Yet.
How to install Intranet SSL Certificate on Tomcat or JBoss ?
Zip file sent by us has the server certificate (server.pfx) in PFX (PKCS12) format. It needs to be imported into the Tomcat/JBoss Keystore file.
To import the SecureNT Intranet SSL Certificate into the Tomcat/JBoss Keystore, use the following command.
keytool -importkeystore -deststorepass inetssl2 -destkeypass inetssl2 -destkeystore [tomcatjbosskeystorefile] -srckeystore server.pfx -srcstoretype PKCS12 -srcstorepass inetssl2 -alias [tomcat/jboss]In the above command replace the tomcatjbosskeystorefile with the Tomcat / JBoss Keystore file you have on your computer.
Also Check: Tomcat keeps its configuration information in the server.xml file. Make sure Tomcat is reading the correct Tomcat / Jboss Keystore file and that port 8443 is enabled for secure connections.
No Comments Yet.
How to install Intranet SSL on XAMPP Server ?
To proceed with the installation, you need to download the certificate zip file and extract its contents onto your device.
Step 1: Set up a Folder for Storing SSL Files
Create a new folder on your XAMPP server to store the SSL files. You will use this folder to store the SSL files for your XAMPP HTTPS setup. Unzip all files here.
Step 2: Locate the Configuration File for Your Localhost Website
There are two methods for finding the configuration file for your website:
-
Method 1: Click Config in the XAMPP control panel and select Apache (httpd-ssl.conf).
-
Method 2: Use the file explorer to find the configuration file located in the folder where you installed the XAMPP control panel.
Step 3: Edit the Virtual Host for Port 443
Open the configuration file in a text editor, such as Notepad, and make the necessary changes. Here’s an example of what the virtual host for port 443 should look like after editing:
DocumentRoot “/var/www”
ServerName intranet-common-name (e.g., localhost)
ServerAlias
SSLEngine on
SSLCertificateFile “D:/xampp/yourwebsite/ssl/server.cer”
SSLCertificateKeyFile “D:/xampp/yourwebsite/ssl/serverkey.cer”
SSLCACertificateFile “D:/xampp/yourwebsite/ssl/CA-bundle.cer”
Note: Remember to replace the server name, alias, and certificate paths with the actual values that apply to your setup. And copy the server.cer, serverkey.cer and CA-bundle.cer to the required path viz., D:/xampp/yourwebsite/ssl/
Step 4: Restart the Server
Finally, restart the server by clicking Stop in the XAMPP control panel, then Start. This will ensure that the new SSL certificate is properly applied.
Test your SSL Installation
After you install an SSL Certificate in XAMPP, you should test the certificate installation by visiting your intranet common name on the browser using https protocol.
Tagged In
No Comments Yet.
How to quickly install CA certificates automatically on large number of Windows PCs ?
One can use Microsoft Group Policy to install SecureNT CA certificates on large number of PCs automatically. Here is link to our blog which explains how to do it.
No Comments Yet.
Quick Guide on how to Install Intranet SSL Certificate on IIS ?
Step by step instructions on how to import the SecureNT Intranet SSL Certificate PFX file in Windows IIS Server (any version). It’s a two-step process.
Step-1: How to Import the PFX File in IIS
-
From the Start menu, type MMC, and click OK
-
In the User Account Control window, click Yes
-
In the Console window, in the menu at the top, click File > Add/Remove Snap-in.
-
In the Add or Remove Snap-ins window, under Available snap-ins click Certificates and then, click Add.
-
In the Certificates snap-in window, choose Computer account and then, click Next.
-
In the Select Computer window, select Local computer: (computer this console is running on), and then, click Finish.
-
In the Add or Remove Snap-ins window, click OK.
-
From the Console window, from the Console Root folder, expand Certificates (Local Computer) (the certificate file will be in Personal or Web Hosting folder).
-
Right-click on the certificate file which you want to import and then click All Tasks > Import
-
On the Welcome to the Certificate Import Wizard page, click Next.
-
Follow the instructions to import the primary SSL certificate from the PFX file
-
On the Certificate Store page, select Automatically select the certificate store based on the type of certificate.
-
Double-check your settings and then click Finish
You should see “The import was successful” message.
Step-2: How to Enable the SSL Certificate
-
From the start menu, search for Administrative Tools, open it, and double-click on Internet Information Services (IIS) Manager.
-
Under Connections, expand your server’s name, expand Sites, and then, click the site that you want to encrypt.
-
In the Actions menu, under Edit Site, click Bindings.
-
In the Site Bindings window, click Add.
-
In the Add Site Binding window, from the drop-down lists select: HTTPS, All Unassigned, and enter port 443.
-
From the SSL certificate drop-down list, select the certificate you want to import
-
Click OK and restart your IIS server
SecureNT Intranet SSL certificate is now installed on IIS.
Following article has the steps shown with screen-shots:
How to Import the SSL Certificate w/Private Key.pfx File
Tagged In
No Comments Yet.
What to do if the Client browser gives an error while accessing Servers with Intranet SSL ?
Check this:
-
Please check if you have installed Intranet Root/Intermediate CA Certificates on Windows PCs or Macs. If they are already installed then it could be an antivirus blocking access to the root certificate, thinking that is not a trusted root certificate. In this case, create an exception in the setting of the anti-virus to allow access to SecureNT Intranet root/intermediate CA certificates.
-
On Windows PCs ensure that Intranet Root CA Certificate is installed under “Trusted Root Certification Authorities”; and that Intranet Intermediate CA Certificate is installed under “Intermediate Certification Authorities”.
To install the SecureNT Intranet Root/Intermediate CA Certificates follow the steps given here They need to be installed once, on each Windows client PC. On a Mac, customers will need to open Keychain Manager and explicitly trust each of the two root certificates.
To automate the installation of root certificates on multiple machines, one can use Microsoft’s Group Policy for PCs; and Parallel’s Device Management for Macs. Click here to find the installation details.
Firefox does not use the operating system’s certificate store for storing the root certificates. So, the root certificate chain is added differently. Read this article for details.
No Comments Yet.
Why am I getting an error, even after installation of Root Certificates on the Client PC ?
This sometimes happens due to Antivirus or End Point Security software. They don’t trust non-public Root Certificates and tell the browser that the Intranet Root Certificate is not trusted.
In one case, we noticed that AVG antivirus intercepted the network connection by keeping its own SSL in between, passing an error to the browser that SecureNT Root Certificate is not trusted. The customer created an exception for the error and the browser error stopped.
This problem is not seen with Avast antivirus. Just for information.
No Comments Yet.
Are SecureNT Root Certificates trusted by the browsers ?
Intranet SSL certificate’s root certificate chain is not trusted by default on popular browsers like Chrome, Edge, Internet Explorer, Safari, Firefox, etc. This means that unless certain steps are taken, a client PC will get a “certificate not trusted” error when a user uses a web browser to access a website hosted on a Server with Intranet SSL.
But these steps (installation of SecureNT CA root certificates) need to be taken once only. After those steps are taken, the client PC will always trust the Intranet SSL certificate.
You can find the steps here.
Tagged In
No Comments Yet.
Can you provide technical details of SecureNT Intranet SSL Certificates ?
-
Certificates are issued by default with RSA Encryption, 2048 bit Key Size, and Sha256 Hash Algorithm
-
The Root Certificate chain is from Secure Network Traffic
-
Custom Root Certificate chain on your organization name is available on request
-
Client Authentication Certificates for Single Sign-on and Document Management / Signing available on request.
-
RSA Certificates with different Key Size and Hash Algorithm available on request ECDSA Certificates with 256 and 384-bit Key Size also available on request
Tagged In
No Comments Yet.
How to Create CSR with SAN Values Using OpenSSL ?
For creating CSR with SAN values (X.509 v3 Extension) it’s important to create a configuration file with the required certificate details. Execute following command in openssl.
openssl req -newkey rsa:2048 -nodes -keyout pvtkey.cer -config config.cnf -out csr.txt -utf8It will create a Private key (pvtkey.cer) and CSR file (csr.txt).
Sample Configuration file (config.cnf)
[req]
prompt = no
distinguished_name = dn
req_extensions = ext

[dn]
CN = 192.168.2.23
O = Abc Corporation
L = Sydney
ST = New South Walse
C = AU

[ext]
subjectAltName = @alt_names

[alt_names]
IP.1 = 192.168.2.23
IP.2 = 10.12.4.112
DNS.1 = 192.168.2.23
DNS.2 = 10.12.4.112
DNS.3 = sms.abc.local
DNS.4 = localhost
Note that you need to put City name against "L" (=Location), and 2 letter Country ISO code against "C" (=Country).
It will generate CSR with CN=192.168.2.23 and 3 SAN values: 10.12.4.112, sms.abc.local and localhost.
Notice that when IP address is there in CN or SAN, we need to put its value against both IP Address and DNS. For others (URL, Servername etc) only DNS value is required.
Tagged In
No Comments Yet.
How to create the CSR with SAN in Windows IIS ?
Following steps are applicable for all versions of IIS. Windows Server should be domain joined.
-
Open the MMC console and add the Certificate snap-in to it as Local Computer. Right Click Personal node on the left and Select All Tasks –>Advanced Operations –> Create Custom Request.
-
Choose Proceed without enrollment policy and Click Next. Choose No Template Legacy Key for compatibility reasons. Use PKCS#10.
-
Click Next and click Properties. Give a friendly name for the certificate and a description. Ensure that you hit Apply as soon as you are done with the tab.
-
Click on Subject tab and add all the hostnames under “Alternative Name“. Under Subject Name, enter the Common Name (CN), Organizational Unit (OU), Organization (O), State (S), City (L), and 2 letter Country (C) code values. Click Apply.
-
Under the Extensions tab, expand Extended Key Usage (application policies) and select Server Authentication and Client Authentication. Click Apply.
-
Under the Private Key tab, set the Key size to 2048 (or 4096) under Key options. Tick Make Private Key exportable. Select Exchange as the Key type. Click Apply. Click OK.
-
Select a location to save the file. Choose the file format as Base 64. Click Finish.
CSR is generated with SAN values.
Tagged In
No Comments Yet.
How to deploy SSL Certificate in Windows Azure environment ?
Installation of SSL Certificate in Windows Azure environment is different. It requires a special password protected PFX file with Triple DES encryption. Please mention this requirement while placing request to us. We will send this special PFX file.
Installation steps are given on this Blog Post.
Tagged In
No Comments Yet.
How to generate correct CSR when IP address is in CN or SAN ?
When an internal/external IP Address is part of Common Name (CN) or Subject Alternative Name (SAN) care needs to be taken while generating the CSR.
If not done correctly then the latest browsers like Chrome and Edge give an error – “Your connection to this site is not secure.” Note that deprecated Microsoft Internet Explorer does not give any error in this case.
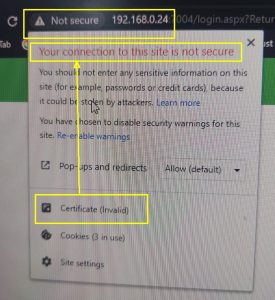
To avoid this problem please ensure that the IP address is mentioned in the SAN extension as DNS value and IP Address. For example, if CN=192.168.23.1 then the CSR should have 2 SAN values viz., DNS=192.168.23.1 and IP=192.168.23.1
If you wish to generate the CSR on Windows Server then read this FAQ. How to create the CSR with SAN in Windows IIS
If you wish to generate the CSR using OpenSSL then this link explains step-by-step how to generate the CSR using OpenSSL
Tagged In
No Comments Yet.
How to install Intranet SSL on Ubuntu Linux ?
If you asked for the Intranet SSL without CSR, you would have received server.pfx file on email.
-
Copy the server.pfx file to the Ubuntu machine
-
Ensure that openssl package is installed on Ubuntu
-
Run the following command: sudo openssl pkcs12 -in server.pfx -passin pass:inetssl2 -out serverpfx.pem -nodes This will create a serverpfx.pem file, which contains the issued certificate, two CA certificates and the private key.
-
Move the serverpfx.pem file to /etc/ssl/certs/
-
Update the permissions: sudo chmod 644 /etc/ssl/certs/serverpfx.pem
-
Restart the Apache service: sudo service apache2 restart
In case, you wish us to make the serverpfx.pem file, write back to us on support@intranetssl.net
No Comments Yet.
In what format you issue the Intranet SSL Certificates ?
We issue SecureNT Intranet SSL certificate in PEM format with .cer extension.
The PEM format is the most common format used for certificates. Extensions used for PEM certificates are cer, crt, and pem. They are Base64 encoded ASCII files.
PEM formatted certificates contain the “Begin Certificate/End Certificate” statements.
The DER format is the binary form of the certificate. DER formatted certificates do not contain the “BEGIN CERTIFICATE/END CERTIFICATE” statements.
DER formatted certificates most often use the ‘.der’ extension. Root Certificates on Resource page are in DER format.
In case, you want them in PEM format send Email to support@intranetssl.net
No Comments Yet.
Is it compulsory to provide CSR to get Intranet SSL ?
Not necessary.
Just fill-up the form and we will generate the CSR (called Auto-CSR). And we will send the SSL Certificate along with the private key.
Tagged In
No Comments Yet.
What are the main features of SecureNT Intranet SSL Certificates ?
- Secure localhost, Server Name, Internal IP Address, Internal Domain, Sub-domain including Wildcard domain e.g., *.company.local
- Secure multiple servers using SAN values
- Certificates valid up to 10 years
- Install the same certificate on unlimited servers
- The certificate is issued with SecureNT Intranet Root & Intranet Intermediate CA chain. They are to be installed on each client’s machine.
- Fast Issuance, usually less than 24 hours
- Fast Expert Customer Support
- Automatic renewal reminders and early renewal options
- 30-day free certificate for Single Domain. 7-day free certificate for Multi-domain and Wildcard.
- Certificates with Custom Root CA in the name of your Organization are available
- Client Authentication Certificates for Web-based Applications and Document Management Systems available
Tagged In
No Comments Yet.
While requesting Intranet SSL, should I generate CSR or just give certificate details ?
Good question.
It is always recommended to generate CSR on your web server and share with us. This is because the private key generated during the CSR generation remains on your server, within your premises.
On the other hand, if you give certificate details to us, we generate the CSR. It is called Auto-CSR. During this process, private key is generated on our machine. When we ship the Intranet SSL to you, we send the SSL certificate along with the private key. This method is slightly risky because the private key can be intercepted by someone when it is sent through email.
But generation of CSR for Intranet SSL poses some technical challenges. Reason is that modern browsers expect the CSR to have require SAN values correctly specified.
For example, if the Common Name is “abc.local” then the CN=abc.local and SAN value should be DNS=abc.local. But it is not easy to generate CSR with SAN values on Windows or Linux.
Another issue comes when the certificate is to be issued to an IP address. In this case SAN should have two values. They are DNS=[IP-address] and IP=[IP-Address].
If any of these SAN values are not specified while generating the CSR then browser gives 'Certificate not Trusted' error.
Of course, we have shared the steps to generate CSR with SAN values. Link is given below.
Tagged In
No Comments Yet.
How to Install and Configure SecureNT Intranet SSL Certificate on Your Apache Server ?
-
Copy the required certificate files to your server from the supplied zip file.
a. server.cer (File #1)
b. SecureNT CA-Bundle.cer (File #5)Copy these files, along with the .key file (Private Key) you generated when creating the CSR, to the directory on the server where you keep your certificate and key files. Use serverkey.cer (File #2, Private Key) when generated by SecureNT.
Note: Make them readable by root only to increase security. -
Find the Apache configuration file (httpd.conf) you need to edit.
The location and name of the configuration file can vary from server to server—especially if you're using a special interface to manage your server configuration.- Apache's main configuration file is typically named httpd.conf or apache2.conf. Possible locations for this file include /etc/httpd/ or /etc/apache2/. For a comprehensive listing of default installation layouts for Apache HTTPD on various operating systems and distributions, see Httpd Wiki - Distros Default Layout.
- Often, the SSL certificate configuration is located in a
block in a different configuration file. The configuration files may be under a directory like /etc/httpd/vhosts.d/, /etc/httpd/sites/, or in a file called httpd-ssl.conf.
One way to locate the SSL Configuration on Linux distributions is to search using grep, as shown in the example below. Run the following command:
grep -i -r "SSLCertificateFile" /etc/httpd/Note: Make sure to replace /etc/httpd/ with the base directory of your Apache installation.
-
Configure the
block for the SSL-enabled site a. Below is a very simple example of a virtual host configured for SSL. Last 4 lines starting with "SSLEngine on" needs to be added.
<VirtualHost 192.168.0.1:443>
    DocumentRoot /var/www/html2
    ServerName www.yourdomain.com
        SSLEngine on
        SSLCertificateFile /path/to/server.cer
        SSLCertificateKeyFile /path/to/your_private.key
        SSLCertificateChainFile /path/to/SecureNT CA-Bundle.cer
    </VirtualHost>
b. Make sure to adjust the file names to match your certificate files.
- SSLCertificateFile is your SecureNT certificate file (e.g., server.cer).
- SSLCertificateKeyFile is the .key file generated when you created the CSR (e.g., serverkey.cer or your_private.key).
-
SSLCertificateChainFile is the SecureNT CA certificate file Bundle (e.g., SecureNT CA-Bundle.cer)
Note: If the “SSLCertificateChainFile” directive does not work, try using the “SSLCACertificateFile” directive instead.
- Test your Apache configuration file before restarting.
As a best practice, check your Apache configuration file for any errors before restarting Apache.
Caution: Apache won't start again if your configuration files have syntax errors. Run the following command to test your configuration file (on some systems, it's apache2ctl):
apachectl configtest
- Restart Apache.
You can use
apachectlcommands to stop and start Apache with SSL support.apachectl stop apachectl start
Restart Notes:
If Apache doesn't restart with SSL support, try using apachectl startssl instead of apachectl start. If SSL support only loads with apachectl startssl, we recommend you adjust the apache startup configuration to include SSL support in the regular apachectl start command. Otherwise, your server may require to manually restart Apache using apachectl startssl in the event of a server reboot. This usually involves removing the <IfDefine SSL> and </IfDefine> tags that enclose your SSL configuration.
Congratulations! You've successfully installed your SecureNT Intranet SSL certificate.
Tagged In
No Comments Yet.
How to install Intranet SSL Certificate on SAP Server ?
Downloading and Installing the SAPGENPSE Cryptography Tool
Download the SAPGENPSE Cryptography tool that is part of the SAP Cryptographic Library in the SAP Service Marketplace and install it.
On the Data Integration Service machine, download the latest available patch for the SAPGENPSE tool based on the operating system.
At the command prompt, navigate to the directory that contains the SAPCAR.EXE file and the SAPCRYPTOLIB_*.SAR file.
Extract the SAR file. For example, enter the following command at the command prompt:
sapcar.exe -xvf SAPCRYPTOLIB_39-10010895.SARThe SAPGENPSE files are extracted to the nt-x86_64 directory within the current directory.
Then rename following 2 files:
"SecureNT Intranet Root CA.cer" --> SecureNT_Intranet_Root_CA.cer
"SecureNT Intranet Intermediate CA.cer" --> SecureNT_Intranet_Intermediate_CA.cer
Following commands will install the Intranet SSL on the SAP server.
sapgenpse import_12 -p /usr/sap/ssl/SAPSSLS.pse -r SecureNT_Intranet_Root_CA.cer -r SecureNT_Intranet_Intermediate_CA.cer /usr/sap/ssl/server.pfx

setenv SECUDIR /usr/sap/WS4/W00/sec/

sapgenpse seclogin -p SAPSSLS.pse
Breakdown:
-p SAPSSLS.pse: Specifies the name of the PSE file, in this case, SAPSSLS.pse.
-r RootCA.cer: This imports the Root Certificate Authority (CA) certificate into the PSE.
-r IntermediateCA.cer: This imports the Intermediate CA certificate, which can act as a bridge between the Root CA and the end entity certificate.
server.pfx: This file contains the actual SSL certificate in PFX format, which is a combination of a private key and the issued certificate.
Key Point: The -r option is used multiple times to specify certificates that are being imported into the SAP Personal Security Environment (PSE). In this case, the Root CA and Intermediate CA certificates.
How to install SecureNT CA certificates on SAP Basis ABAP
- Execute the tcode: Strust. You will see "Trust Manager: Display"
- Click on "Change" mode located on top left corner. You will see "Trust Manager: Change"
- Goto the certificate section and double click on it.
- Select "SSL Client SSL Client (Standard)". Press Right Click and select "Create".
- Click on "Import Certificate" (It's located on bottom left. First icon)
- In the Import Certificate dialog box specify the associated file name from the file system. The CA certificates are "SecureNT Intranet Root CA.cer" and "SecureNT Intranet Intermediate CA.cer"
- Select the CA certificates one by one. And click on Open button.
- You should see the certificate displayed in the certificate section. Click on "Add to Certificate List" and Save the CA certificate. Repeat it for the second CA certificate.
- The CA certificates will get added to the certificate list in the PSE maintenance section.
- Click "Save" button located on top (floppy disk).
- Restart the server "stopsap"
No Comments Yet.
Why do I need to install the CA cert on the client desktops also ?
It’s a good question. If public CA could issue SSL certificates for internal names like local hosts, IP addresses, or server names then we - Private Certifying Authority (CA) - won’t exist.
We issue SSL certificates to local hosts, server names, IP addresses and internal URLs. They are SSL certificates for internal network names. And our CA certificates are not trusted by the browsers and the client Operating Systems like Windows.
Reason for this situation is that CA/browser Forum which governs Public Certifying Authorities (CA) decided in 2015 that public CA can’t issue SSL certificates to Internal Names and internal IP addresses. See this file for details.
Hence Public CAs like Let’s Encrypt, DigiCert, GlobalSign, EnTrust etc. can’t issue SSL certificates for internal networks.
So, who so ever issues SSL for Internal Names or internal IP addresses have to issue them with non-public/Private CA roots only.
When you use such SSL certificates Operating System vendors and browsers don’t trust them because of CA Browser Forum’s policy. So, for browser to trust them customer needs to install Private CA roots on to each client device.
- It's simple and takes hardly 10-15 seconds to install.
- It has to be done once only.
- If you have many devices then you can use Microsoft Group Policy to install on all connected devices in a few minutes.
- No matter who supplies your Intranet SSL, this technical requirement will always be there.
- All our customers do it because it gives them peace of mind.
It’s super easy to install using Microsoft Group Policy. See our blog page for details.
Our customers use SecureNT Intranet SSL certificates for internal web application like ERP, Email, HRMS, CRM, Service Desk, Analytics, etc and so on. These are very critical applications for their business. So, due to our certificates important flowing on the internal networks is encrypted. And their data is protected from the hackers and employees with wrong intentions.
Tagged In
No Comments Yet.
How to get SSL Certificate for an IP address, Server Name, or localhost ?
How to get Intranet SSL from your website? ?
This video shows step by step how to get SecureNT Intranet SSL from our website.
In case you wish to generate CSR and you want us to generate the Intranet SSL then keep following points in mind.
- While generating CSR for Intranet SSL you need to ensure that relevant SAN value is part of the CSR. If SAN value is missing then we will have to ask you to generate CSR again with required SAN values.
- While generating CSR for IP address you need to ensure that two SAN values are there in the CSR. They are DNS=
and IP= . This is explained in - How to generate correct CSR when IP address is in CN or SAN - Following FAQs explain how to generate CSR with SAN values in Windows and Linux Servers.
How to generate correct CSR when IP address is in CN or SAN
How to Create CSR with SAN Values Using OpenSSL
In case you find it difficult to generate the CSR on your web server, don't worry. We will generate the Auto-CSR and we will send you the Intranet SSL in PFX format with Private Key.
Tagged In
No Comments Yet.
How to create CSR with SAN on Windows Data Center Edition ?
To generate a CSR (Certificate Signing Request) with SAN (Subject Alternative Names) on Windows Server 2022 Datacenter Edition, the most straightforward and flexible method is using PowerShell with a custom INF file and the Certreq utility.
Here’s a step-by-step guide:
✅ Step 1: Create an INF File (Certificate Request File)
To create a CSR with CN with 2 DNS SANs and 2 IP SANs .Create a new text file named request.inf and paste the following content into it:
[Version]
Signature="$Windows NT$"

[NewRequest]
Subject = "CN=<CN>; O=<Org Name>; L=<City>; S=<state>; C=<2 Digit Country Code>"
KeySpec = 1
KeyLength = 2048
Exportable = TRUE
MachineKeySet = TRUE
SMIME = FALSE
PrivateKeyArchive = FALSE
UserProtected = FALSE
UseExistingKeySet = FALSE
ProviderName = "Microsoft RSA SChannel Cryptographic Provider"
ProviderType = 12
RequestType = PKCS10
KeyUsage = 0xa0

[Extensions]
2.5.29.17 = "{text}"
_continue_ = "dns=<CN>&"
_continue_ = "dns=<SAN-1>&"
_continue_ = "dns=<SAN-2>&"
_continue_ = "dns=<IP-1>&"
_continue_ = "dns=<IP-2>&"
_continue_ = "ip=<IP-1>&"
_continue_ = "ip=<IP-2>"

[RequestAttributes]
CertificateTemplate = WebServer
Customize these fields:
CN=Your primary domain name e.g., *.server.local Under [Extensions] → List all DNS SANs (dns=SAN) and all IP SANs with (dns=IP-address) and (ip=IP-address) separated by "&"
Add or remove SANs as needed
✅ Step 2: Generate the CSR Using certreq
Open PowerShell as Administrator and run:
certreq -new request.inf server.csrThis creates a CSR file named server.csr which you can submit to SecureNT.
✅ Step 3: Submit CSR to CA
If you are using a private CA (SecureNT), upload the CSR as part of your certificate request.
✅ Step 4: Install the SSL Certificate
After receiving the signed certificate (.cer or .crt), install it with:
certreq -accept server.cerTagged In
No Comments Yet.
Categories
Tags